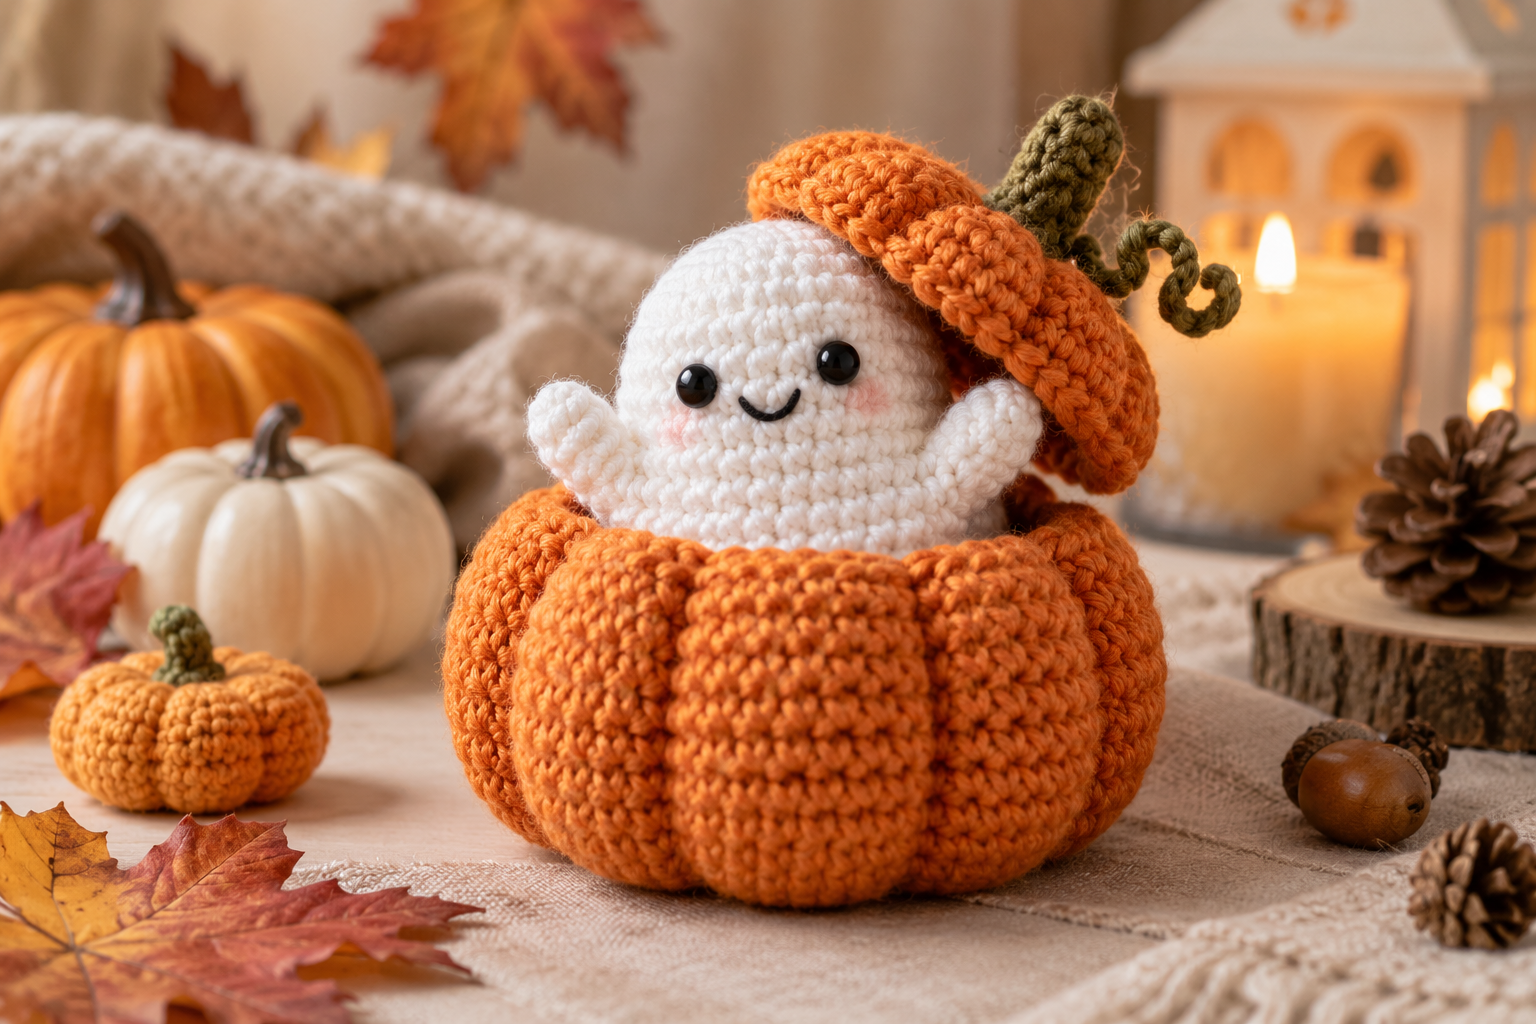
Bring a little handmade charm to your Halloween decorating with these cute crochet Halloween ghosts in pumpkins. This playful project combines two classic Halloween characters—a friendly ghost and a cheerful pumpkin—into one adorable crochet decoration that works beautifully for shelves, tables, mantels, coffee stations, party displays, and seasonal kitchen decor.
Unlike scary Halloween decorations, these little crochet ghosts have a soft, whimsical appearance. The pumpkin provides a warm autumn-colored base, while the white ghost peeking out from the top creates the perfect spooky-season detail.
This project is also easy to customize. You can make the ghost happy, surprised, sleepy, or slightly spooky, change the pumpkin colors, add tiny crochet leaves, or create several pumpkins in different sizes for a coordinated Halloween display.
If you’re building a collection of Halloween crochet ideas for your home, this is a particularly useful project because it is small, inexpensive to make, and easy to display almost anywhere.
Why You’ll Love These Crochet Halloween Ghosts in Pumpkins
Small seasonal crochet projects are perfect when you want to decorate your home without spending weeks making one large project.
These crochet ghost pumpkins have several advantages:
- Great for Halloween decorating
- Suitable for beginners with basic crochet experience
- Uses relatively small amounts of yarn
- Works well with leftover yarn
- Easy to customize
- Can be made in multiple sizes
- Perfect for shelves and tables
- Works beautifully as kitchen or dining-room decor
- Makes a cute handmade Halloween gift
- Can become part of a larger crochet Halloween collection
The design also gives you an opportunity to practice shaping, working in rounds, increasing, decreasing, stuffing, embroidery, and simple appliqué techniques.
What You’ll Make
The finished decoration consists of three main components:
- A small pumpkin-shaped crochet base
- A white crochet ghost emerging from the pumpkin
- Small decorative details such as a stem, leaves, and facial features
The pumpkin can be made as a slightly rounded three-dimensional piece, while the ghost is worked separately and attached or positioned inside the opening.
This construction allows you to customize each part independently.
Finished Size
The finished size depends on your yarn, hook, stuffing, tension, and how large you make the pumpkin.
For a small tabletop decoration, the following dimensions are a useful starting point:
| Feature | Approximate Size |
|---|---|
| Pumpkin width | 10–12 cm |
| Pumpkin height | 8–10 cm |
| Ghost height | 7–10 cm |
| Overall height | 15–18 cm |
| Recommended hook | 3.5–4 mm |
| Yarn weight | Worsted or medium |
| Difficulty | Beginner to intermediate |
You can easily make the project larger by using thicker yarn and a larger hook.
Materials You’ll Need
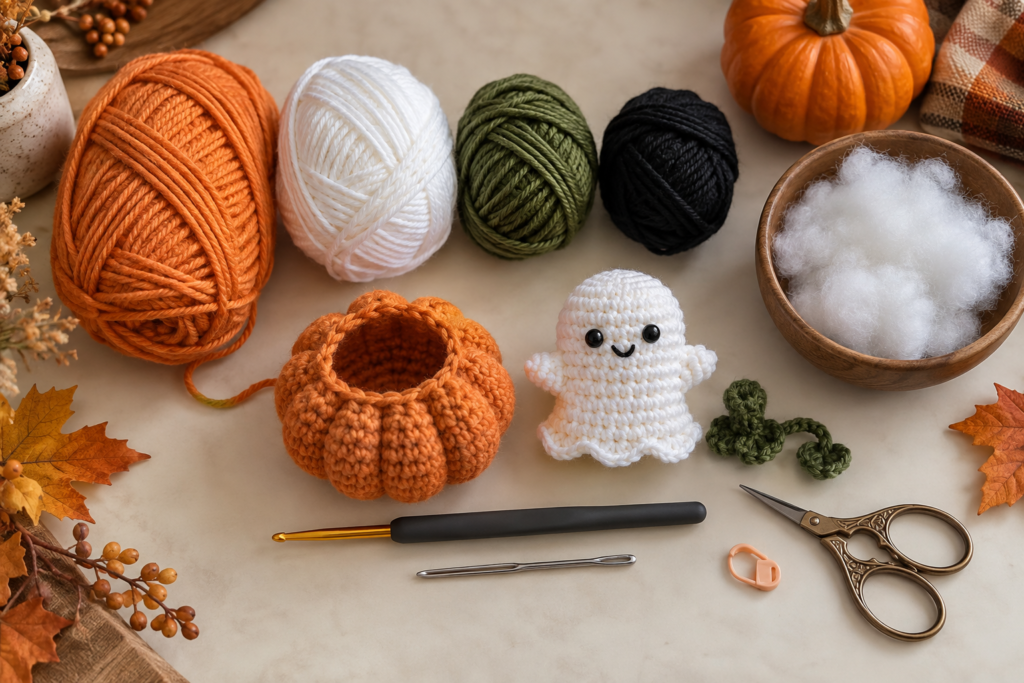
You don’t need a large collection of supplies for this project.
| Material | Recommended Color | Purpose |
|---|---|---|
| Worsted-weight yarn | Orange | Pumpkin |
| Worsted-weight yarn | White | Ghost |
| Small amount of yarn | Green | Stem and leaves |
| Small amount of yarn | Black | Eyes and mouth |
| Crochet hook | 3.5–4 mm | Main crochet work |
| Fiberfill stuffing | White | Pumpkin and ghost |
| Tapestry needle | — | Sewing pieces |
| Stitch marker | — | Marking rounds |
| Scissors | — | Cutting yarn |
| Optional safety eyes | Black | Ghost face |
| Optional embroidery needle | — | Facial details |
If you’re making the decoration for a home with young children or pets, embroidered facial features are a practical alternative to small detachable safety eyes.
Choosing Yarn for Halloween Crochet
A medium or worsted-weight yarn is a convenient choice because it produces a substantial fabric without making the project too bulky.
For the pumpkin, look for warm shades such as:
- Pumpkin orange
- Burnt orange
- Rust
- Terracotta
- Cinnamon
- Dark orange
For the ghost, white or ivory creates the traditional Halloween appearance.
If you prefer a softer aesthetic, try cream instead of bright white.
For the stem, sage, olive, or dark green works beautifully.
Halloween Color Combinations
You don’t have to use traditional orange and black.
Try one of these combinations:
| Pumpkin | Ghost | Details | Style |
|---|---|---|---|
| Orange | White | Black | Classic Halloween |
| Rust | Cream | Brown | Rustic fall |
| Sage | Ivory | Black | Soft modern |
| Purple | White | Black | Witchy Halloween |
| Black | White | Orange | Dramatic |
| Dusty pink | Cream | Brown | Cute pastel Halloween |
| Mustard | Ivory | Black | Autumn-inspired |
A group of pumpkins in different colors can create a much more interesting display than making every piece identical.
Crochet Abbreviations
This project uses standard US crochet terminology.
| Abbreviation | Meaning |
|---|---|
| ch | Chain |
| sc | Single crochet |
| hdc | Half double crochet |
| sl st | Slip stitch |
| st | Stitch |
| sts | Stitches |
| inc | Increase |
| dec | Decrease |
| rnd | Round |
| BLO | Back loop only |
Skills You’ll Practice
This project is useful for improving several fundamental crochet techniques.
You’ll practice:
- Working in continuous rounds
- Single crochet
- Increasing
- Decreasing
- Shaping three-dimensional crochet
- Stuffing crochet pieces
- Closing openings
- Sewing crochet pieces together
- Embroidering facial details
- Making small decorative pieces
If you’ve already made crochet pumpkins or amigurumi, you’ll find many of these techniques familiar.
Before You Start
Because the pumpkin and ghost are stuffed, your tension should be firm enough that the stuffing does not show through the stitches.
If you crochet very loosely, consider using a smaller hook.
You don’t want the finished pumpkin to have large gaps between stitches.
At the same time, avoid crocheting so tightly that it becomes difficult to insert your hook.
A comfortable, consistent tension is the goal.
Crochet Halloween Ghost Pumpkin Pattern
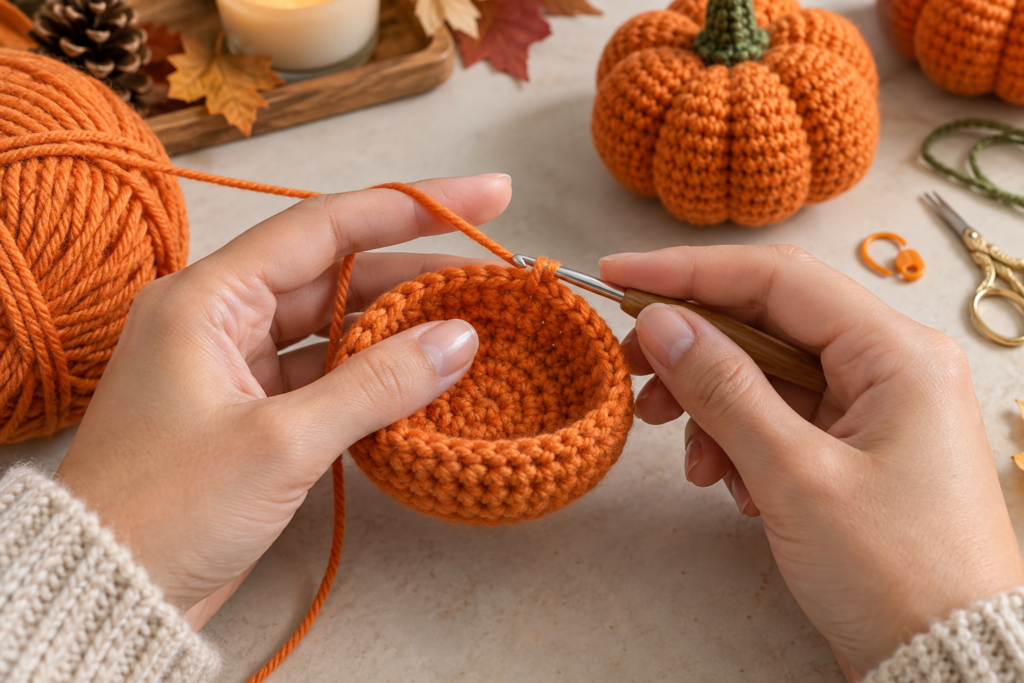
The decoration is easiest to make by completing the pumpkin first, then crocheting the ghost, and finally assembling the pieces.
The basic construction is:
Pumpkin → Ghost → Stem and leaves → Face → Assembly
You can work the pumpkin in orange and the ghost in white.
Step 1: Crochet the Pumpkin Base
Start with orange yarn.
Make a magic ring.
Work 6 single crochet stitches into the ring.
Pull the ring closed.
Place a stitch marker at the beginning of the round if you’re working in continuous rounds.
Step 2: Increase the Pumpkin
Work increases evenly around the next rounds to gradually enlarge the circular base.
A simple progression is:
Round 1: 6 sc
Round 2: Increase around — 12 sc
Round 3: Repeat 1 sc, increase — 18 sc
Round 4: Repeat 2 sc, increase — 24 sc
Round 5: Repeat 3 sc, increase — 30 sc
Continue increasing in this gradual manner until the pumpkin reaches the desired width.
The exact number of rounds depends on the yarn and hook you’re using.
Step 3: Build the Pumpkin Body
Once the base reaches the desired width, stop increasing.
Continue working single crochet around without increases.
This allows the sides to grow upward and creates the rounded pumpkin body.
Work several rounds until the pumpkin reaches approximately 8–10 cm tall.
Try placing the pumpkin on a flat surface as you work.
It should gradually develop a rounded shape rather than becoming extremely tall or flat.
Step 4: Start Decreasing
Once the pumpkin has reached the desired height, begin decreasing.
Work decreases evenly around the next rounds.
Do not close the opening immediately.
You need enough room to add the stuffing.
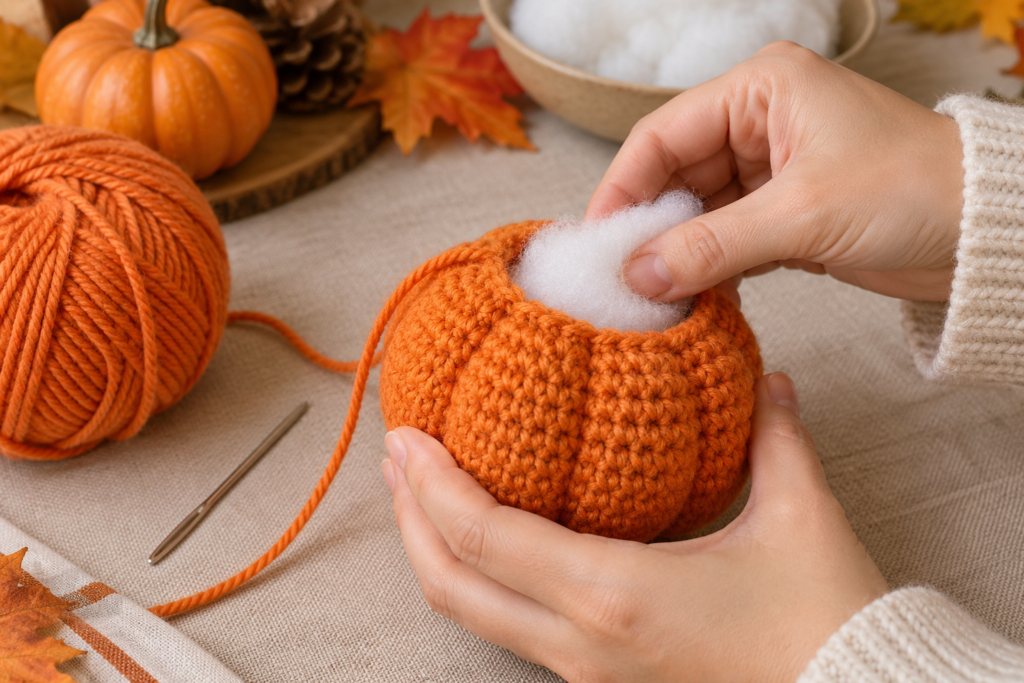
Step 5: Stuff the Pumpkin
Before the opening becomes too small, begin adding fiberfill.
Add small amounts at a time rather than pushing a large amount of stuffing inside at once.
Distribute the stuffing evenly.
The pumpkin should feel firm but not rock hard.
Overstuffing can stretch the stitches and distort the shape.
Understuffing can make the pumpkin look flat.
A slightly firm stuffing level usually gives the best result.
Step 6: Finish the Pumpkin
Continue decreasing until only a small opening remains.
Add a little more stuffing if necessary.
Then close the remaining opening using a tapestry needle.
Pull the yarn through the final stitches and secure it firmly.
Weave in the remaining end.
At this stage, you should have a small rounded orange pumpkin.
How to Create Pumpkin Sections
For a more realistic pumpkin shape, you can create subtle vertical divisions.
Thread a long piece of orange or matching yarn onto a tapestry needle.
Insert the needle from the bottom center of the pumpkin and bring it up through the top.
Pull the yarn gently around one side of the pumpkin.
Repeat around the pumpkin to create several shallow grooves.
Do not pull too tightly.
The goal is to create gentle pumpkin-shaped sections rather than dramatically compressing the stuffing.
This technique can make a simple crochet sphere look much more like a pumpkin.
Step 7: Crochet the Ghost
Now it’s time to make the little ghost.
Using white or ivory yarn, begin with a magic ring.
Work 6 sc into the ring.
Increase gradually over several rounds until you reach the desired width.
Continue working rounds without increasing to create the ghost’s body.
The ghost should be slightly narrower than the pumpkin opening.
Step 8: Shape the Ghost Body
A cute crochet ghost doesn’t need complicated shaping.
Keep the upper portion rounded and gradually widen the lower section.
For a friendly appearance, you can create a slightly flared bottom.
This gives the ghost a soft floating shape.
Continue until the ghost reaches approximately 7–10 cm tall.
Step 9: Create the Ghost’s Bottom Edge
For a classic ghost appearance, give the bottom edge a slightly irregular shape.
Instead of making the bottom perfectly straight, vary the stitch heights or create small rounded points.
Another beginner-friendly option is to keep the edge simple and add a scalloped crochet border.
This creates a soft, playful appearance.
Step 10: Stuff the Ghost
Add a small amount of fiberfill if you want the ghost to have a three-dimensional shape.
Don’t overstuff it.
The ghost should remain soft and slightly flexible.
If you want the ghost to appear as though it is floating out of the pumpkin, keep the lower portion lightly stuffed.
Step 11: Close the Ghost
Once the ghost has reached the desired size, decrease toward the top.
Close the opening securely with your tapestry needle.
Weave in the yarn end.
The ghost is now ready for its face and final assembly.
How to Make the Ghost Face
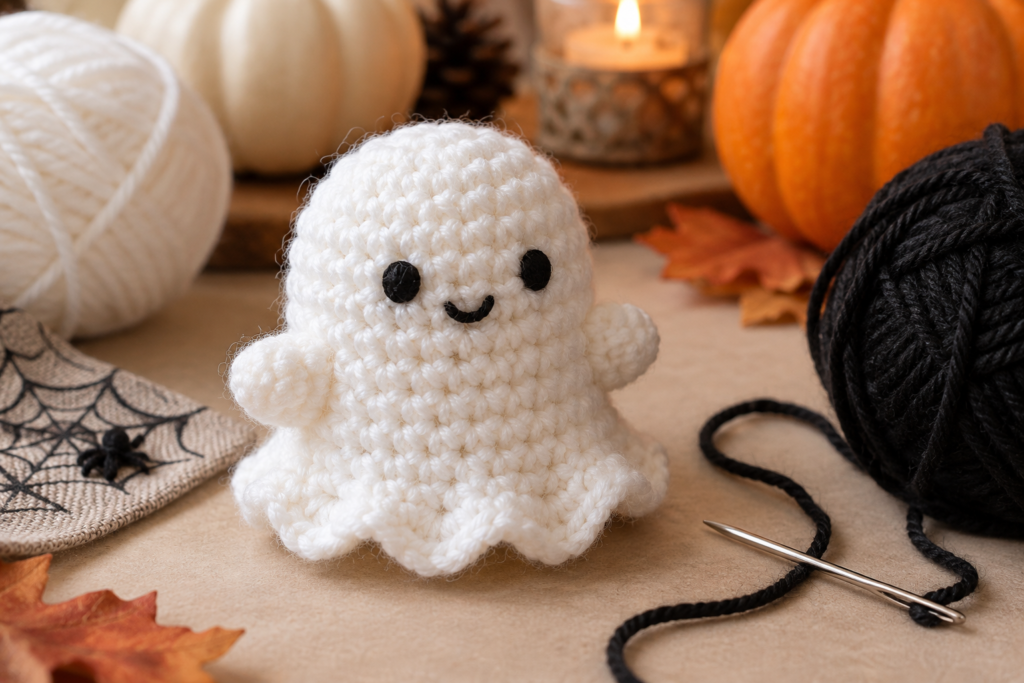
The face is where you can give your ghost its personality.
For a simple design, use black yarn to embroider:
- Two round eyes
- A small oval mouth
For a more playful ghost, try:
- Winking eye
- Smiling mouth
- Surprised expression
- Sleepy eyes
- Tiny blush cheeks
Friendly ghost
Use two small round eyes and a curved smile.
Spooky ghost
Make the eyes slightly larger and use an open oval mouth.
Sleepy ghost
Create two curved embroidered lines for closed eyes.
Cute ghost
Add tiny pink cheeks beneath the eyes.
Embroidered features are particularly useful when you want the finished decoration to remain soft and child-friendly.
How to Place the Ghost Inside the Pumpkin
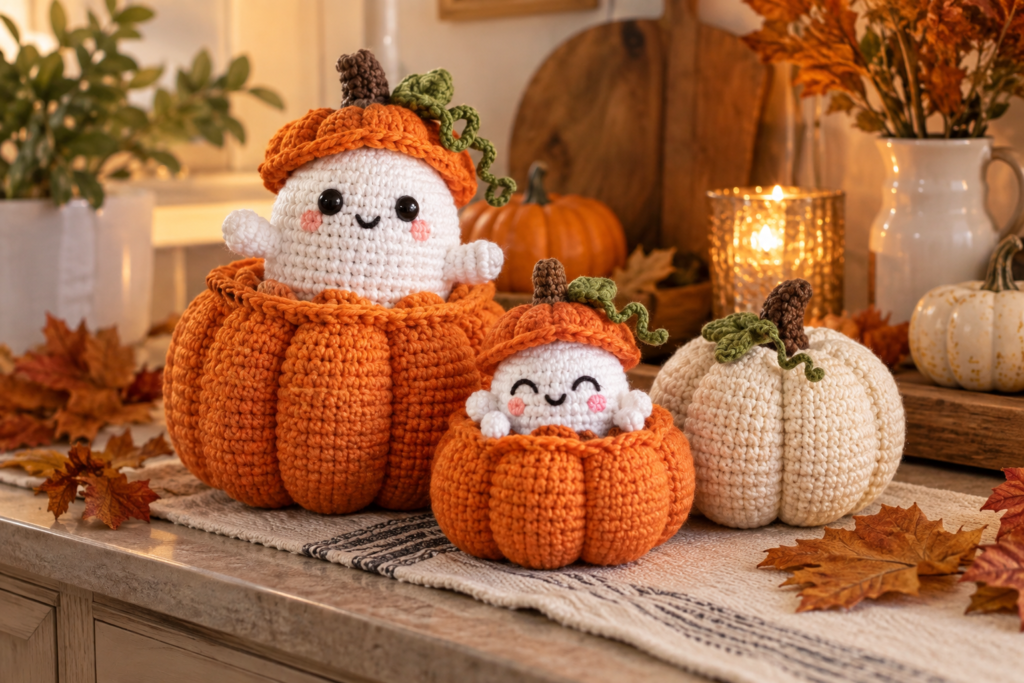
Once both pieces are finished, position the ghost inside or behind the top opening of the pumpkin.
The ghost should appear to be popping out of the pumpkin.
Experiment with the height before attaching it.
A ghost that sits too deeply inside the pumpkin may become difficult to see.
A ghost that sits too high may look disconnected from the pumpkin.
A good starting point is to leave approximately half of the ghost visible above the pumpkin.
How to Secure the Ghost
There are several ways to attach the ghost.
You can sew the bottom of the ghost directly to the inside of the pumpkin.
Alternatively, use a few discreet stitches around the back and sides.
Keep the stitches hidden as much as possible.
You want the ghost to look like it naturally emerges from the pumpkin rather than simply sitting on top.
Crochet Pumpkin Stem
The pumpkin needs a small stem to complete the design.
Using green or brown yarn, chain approximately 5–8 stitches.
Work a few single crochet or slip stitches back along the chain.
Roll or fold the small piece slightly to create a stem shape.
Sew it securely to the top of the pumpkin behind the ghost.
For a more traditional appearance, use brown yarn.
For a brighter Halloween look, use green.
Crochet Pumpkin Leaves
Small leaves are optional but can make the finished pumpkin look much more detailed.
With green yarn:
- Chain several stitches.
- Work stitches back along the chain.
- Shape the piece into a small leaf.
- Fasten off.
- Sew it beside the stem.
You can make one leaf or several small leaves.
How to Make a Curly Pumpkin Vine
A tiny curly vine is another easy decorative detail.
Chain approximately 8–12 stitches.
Work slip stitches back along the chain.
The chain naturally curls slightly when you release it.
Sew one end near the pumpkin stem.
You can also wrap the finished chain around a crochet hook briefly to encourage a more defined curl.
Adding the Pumpkin Face
You don’t need to make the pumpkin into a traditional jack-o’-lantern.
Because the ghost is already the main character, a simple pumpkin face can work beautifully.
Try:
- Small triangular eyes
- Tiny black dots
- Curved eyebrows
- A small smile
- A traditional jack-o’-lantern grin
If you want a minimalist decoration, leave the pumpkin completely plain and let the ghost provide the Halloween detail.
How to Make Different Ghost Expressions
One of the easiest ways to make a collection look interesting is to give every ghost a different expression.
| Expression | Face |
|---|---|
| Happy | Round eyes + smile |
| Surprised | Round eyes + oval mouth |
| Sleepy | Closed curved eyes |
| Shy | Small eyes + tiny smile |
| Spooky | Large eyes + open mouth |
| Playful | One wink + smile |
This works especially well when making three or more pumpkins together.
How to Make Different Pumpkin Sizes
The pattern is easy to resize.
For a miniature pumpkin:
- Use lighter yarn.
- Use a smaller hook.
- Stop increasing earlier.
For a large pumpkin:
- Use thicker yarn.
- Use a larger hook.
- Add additional increase rounds.
- Continue the body for more rounds.
A group of three different sizes can create a much more attractive Halloween display.
Easy Halloween Crochet Color Ideas
Don’t feel limited to orange pumpkins.
Try a collection using:
Traditional: Orange + white + black
Neutral: Cream + ivory + brown
Modern: Sage + cream + charcoal
Witchy: Purple + black + green
Pastel Halloween: Peach + lavender + cream
Autumn: Rust + oatmeal + mustard
How to Make a Whole Crochet Ghost Pumpkin Family
If you’re making these for Halloween decorating, creating a group can be more effective than making a single piece.
Make:
- One large pumpkin with a tall ghost
- One medium pumpkin with a smiling ghost
- One small pumpkin with a sleepy ghost
Place them together on a shelf or table.
Varying the sizes and expressions makes the collection feel more intentional.
Where to Display Crochet Ghost Pumpkins
These decorations are small enough to work in many areas of the home.
Try placing them:
- On a fireplace mantel
- On a bookshelf
- On a coffee table
- On an entryway console
- On a kitchen counter
- On a dining table
- Beside a coffee station
- On a tiered tray
- Around a Halloween centerpiece
- On a desk
For your kitchen, place one beside a mug station, a seasonal tray, or a basket of fall-themed kitchen accessories.
Create a Halloween Crochet Kitchen Display
These ghost pumpkins can become part of a larger crochet kitchen collection.
Pair them with:
- Crochet pumpkin mug cozies
- Halloween crochet coasters
- Crochet pumpkin coasters
- Halloween potholders
- Crochet dishcloths
- Crochet mug rugs
- Crochet pumpkin baskets
- Halloween kitchen towels
Using the same orange, cream, black, and green palette will make the entire display feel coordinated.
Beginner Tips for Making Crochet Ghost Pumpkins
If you’re new to stuffed crochet projects, focus on maintaining consistent tension.
Your stitches should be close enough that the stuffing doesn’t show through.
When increasing and decreasing, count your stitches regularly.
Use a stitch marker to identify the beginning of each round.
When stuffing, add small pieces gradually.
And don’t be afraid to reshape the pumpkin with your hands as you work.
Small adjustments can make a major difference in the final shape.
Common Problems and How to Fix Them
| Problem | Likely Cause | Solution |
|---|---|---|
| Stuffing shows through | Stitches too loose | Use a smaller hook |
| Pumpkin looks flat | Not enough stuffing | Add more fiberfill |
| Pumpkin is too round | Too many increase rounds | Reduce the widest section |
| Pumpkin is too narrow | Too few increases | Add another increase round |
| Shape looks uneven | Uneven tension | Check stitch consistency |
| Ghost falls inside pumpkin | Insufficient attachment | Add hidden stitches |
| Face looks crooked | Features positioned unevenly | Mark placement before sewing |
| Pumpkin grooves are too deep | Yarn pulled too tightly | Loosen the shaping yarn |
| Stem keeps falling off | Weak attachment | Sew through several stitches |
Why Is My Crochet Pumpkin Not Holding Its Shape?
If the pumpkin looks too soft or collapses when you pick it up, it may need more stuffing or firmer crochet fabric.
Try adding additional fiberfill before closing the opening.
If the stitches are extremely loose, consider using a smaller crochet hook.
Why Can I See the Stuffing?
Visible stuffing usually means the crochet stitches are too loose.
You can fix this by:
- Using a smaller hook
- Crocheting with slightly tighter tension
- Choosing a slightly thicker yarn
- Adding less stuffing
Don’t force excessive stuffing into a loosely crocheted piece because it can stretch the stitches even more.
How Do I Keep the Ghost Standing Up?
If the ghost keeps falling backward or disappearing inside the pumpkin, add a few discreet stitches to attach it to the pumpkin.
You can also slightly increase the width of the lower ghost section so it has a larger area resting inside the pumpkin.
Can I Make These Crochet Ghost Pumpkins Without Stuffing?
Yes.
You can create a flat ghost appliqué and attach it behind the pumpkin opening.
However, a stuffed ghost gives the decoration more dimension and makes it look more like a small amigurumi character.
Can I Use Safety Eyes?
Yes, if appropriate for your intended use.
For decorations intended for homes with small children or pets, embroidered eyes are a safer alternative because there are no small detachable components.
Can I Use These as Halloween Gifts?
Absolutely.
Small crochet decorations are easy to package and make charming seasonal gifts.
You can pair one ghost pumpkin with:
- A fall candle
- Hot chocolate
- Halloween candy
- A crochet mug cozy
- A coffee mug
- A handmade card
A small collection of three pumpkins can also make a lovely hostess or Halloween gift.
How to Make This Project More Eco-Friendly
This is a particularly good project for using yarn scraps.
The pumpkin requires more yarn, but the ghost, stem, leaves, and facial details can all be made from small leftover pieces.
Instead of buying a new skein for every color, check your existing yarn collection first.
You can also reuse stuffing from an old cushion or unfinished project if the material is clean and suitable for crochet stuffing.
How to Store Your Crochet Halloween Decorations
At the end of the Halloween season, store your crochet decorations somewhere clean and dry.
Avoid compressing them under heavy objects because this can permanently flatten stuffed pieces.
A breathable storage container is preferable.
Before storing, make sure the pieces are completely clean and dry.
When Halloween arrives again, gently reshape the pumpkins with your hands.
Frequently Asked Questions
Are crochet ghost pumpkins difficult to make?
They are suitable for beginners who already know basic crochet stitches, particularly single crochet, increases, decreases, and working in rounds. The stuffed construction adds a little more complexity than a flat crochet project.
How much yarn do I need?
Because the project is relatively small, it doesn’t require large quantities of yarn. The exact amount depends on the finished size and yarn weight.
This makes it an excellent scrap-yarn project.
What yarn is best for crochet pumpkins?
Medium or worsted-weight yarn is a convenient choice because it creates a sturdy stuffed fabric and makes the pumpkin large enough to display.
Cotton, acrylic, or cotton-blend yarn can all be used depending on your desired finish.
Can I make the pumpkin in another color?
Yes. Orange is traditional, but cream, rust, sage, mustard, purple, black, and dusty pink can all create beautiful Halloween decorations.
Can I make the ghost larger?
Yes. Simply continue increasing until you reach the desired width, then add additional body rounds before shaping the top.
Make sure the ghost remains proportional to the pumpkin.
Can I make a miniature version?
Absolutely. Use lighter yarn and a smaller hook, and reduce the number of increase rounds.
Miniature ghost pumpkins are especially cute on tiered trays and small shelves.
Can I make the pumpkin without the ghost?
Yes. The pumpkin portion can be used as a standalone crochet pumpkin decoration.
You can also make several plain pumpkins and combine them with one or two ghost pumpkins for variety.
Can I use this design for kitchen decor?
Yes. These small decorations work particularly well on kitchen counters, coffee stations, shelves, tiered trays, and dining tables.
Keep them away from open flames, stovetops, and areas where they could come into contact with food or hot surfaces.
Can I sell finished crochet ghost pumpkins?
If you’re making your own finished physical pieces from your own original design, you can sell those finished items. However, don’t copy or redistribute another designer’s written pattern, photographs, illustrations, or other protected content.
If you create and publish your own pattern, make sure your instructions and images are original.
More Halloween Crochet Ideas
If you enjoyed making these cute crochet ghosts in pumpkins, you can build an entire Halloween crochet collection around the same style.
Try making:
- Crochet pumpkin mug cozies
- Halloween crochet coasters
- Crochet ghost coasters
- Crochet pumpkin baskets
- Crochet black cat decorations
- Crochet spiderweb decorations
- Crochet Halloween garlands
- Crochet candy bags
- Crochet Halloween potholders
- Crochet pumpkin table decorations
These projects can use the same orange, black, cream, green, and purple yarn palette, giving your seasonal collection a cohesive appearance.
Related Crochet Posts
If you’re looking for more seasonal crochet inspiration, these projects are a natural next step:
- Crochet Pumpkin Mug Cozy Pattern | Cozy Fall Coffee Cup Sleeve
- 25 Cute Crochet Pumpkin Patterns for Fall
- 21 Easy Halloween Crochet Projects for Beginners
- 20 Adorable Crochet Ghost Ideas for Halloween
- 25 Crochet Halloween Decor Ideas for Your Home
- 23 Cute Crochet Black Cat Patterns
- 21 Crochet Pumpkin Coaster Ideas
- 27 Easy Crochet Projects for Beginners
- 30 Cozy Crochet Home Decor Ideas
- 25 Crochet Fall Decor Ideas You’ll Want to Make
Final Thoughts
These cute crochet Halloween ghosts in pumpkins are a wonderful example of how a few simple crochet techniques can become a memorable seasonal decoration.
The pumpkin provides a warm autumn base, while the little white ghost adds just enough Halloween character without making the project look frightening. Once you understand the basic construction, you can experiment with different pumpkin sizes, ghost expressions, yarn colors, stems, leaves, and decorative details.
Make one for your kitchen counter, create a trio for your mantel, or build an entire Halloween crochet collection with matching mug cozies, coasters, baskets, and table decorations.
The best part is that this project doesn’t require a large amount of yarn, making it a great way to use leftover orange, white, black, and green yarn from previous projects.
Choose your favorite Halloween colors, grab your crochet hook, and make a little ghost pumpkin ready to haunt your home in the cutest way possible.