
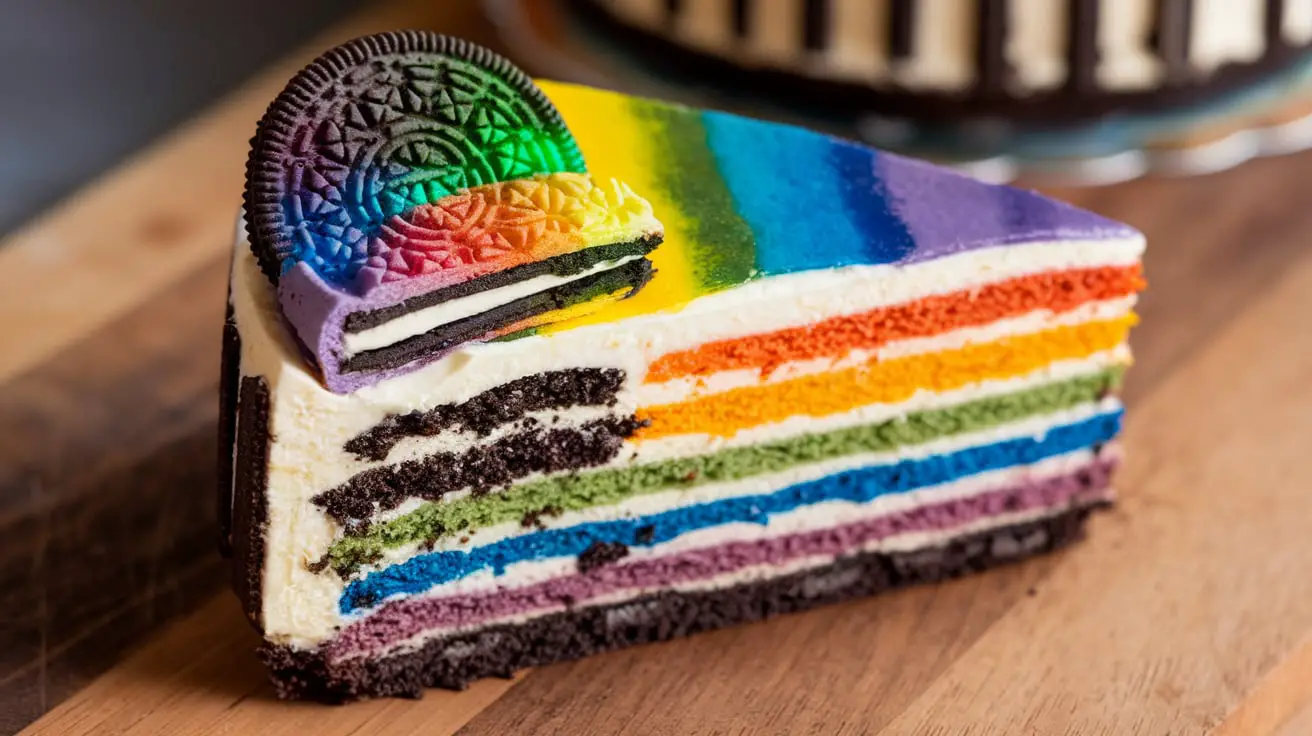
When it comes to desserts that delight both the eyes and taste buds, few can rival the Rainbow Oreo Cheesecake Cake. With its vibrant layers, creamy texture, and crunchy Oreo crust, this dessert is as stunning as it is delicious. Whether for birthdays, parties, or just to brighten your day, this cake is the perfect centerpiece. Ready to create your masterpiece? Let’s explore every step in detail.
Ingredients Overview
Before diving into the process, ensure you have the right ingredients on hand. Using high-quality components will elevate the flavor and appearance of your cake.
Crust:
- 2 cups crushed Oreo cookies (about 20 Oreos)
- 5 tbsp melted butter
Cheesecake Layers:
- 24 oz cream cheese (softened)
- 1 cup granulated sugar
- 3 large eggs
- 1 cup heavy cream
- 1 tsp vanilla extract
- Food coloring: red, orange, yellow, green, blue, purple
Decoration:
- 1 cup white chocolate (for glaze)
- ½ cup heavy cream
- Additional Oreos, sprinkles, or edible glitter
Pro Tip: To ensure vibrant layers, use gel-based food coloring. For a deeper dive into how to achieve the perfect colors, check out this guide to using food coloring in baking.
Equipment Needed
The right tools can make or break your cheesecake-making experience. Here’s what you’ll need:
- Springform pan (9-inch)
- Mixing bowls (several for colored batters)
- Hand or stand mixer
- Silicone spatula
- Baking sheet
- Parchment paper
Baking a cheesecake can be tricky, but using proper techniques helps. If you’re new to the process, refer to this guide to perfect cheesecake baking for invaluable tips.
Step-by-Step Preparation
1. Preparing the Oreo Crust
The foundation of this cake is a rich, chocolatey Oreo crust. Follow these steps:
- Crush Oreos into fine crumbs using a food processor or by placing them in a sealed bag and smashing with a rolling pin.
- Mix the crumbs with melted butter until evenly combined.
- Press the mixture into the bottom of a lined springform pan, ensuring it’s packed tightly.
- Chill in the refrigerator while preparing the cheesecake batter.
2. Making the Cheesecake Batter
This creamy batter is the heart of the cake. Here’s how to prepare it:
- Beat softened cream cheese and sugar together until smooth and creamy.
- Add eggs one at a time, mixing well after each addition.
- Stir in heavy cream and vanilla extract. Be careful not to overmix, as this can introduce air bubbles.
3. Creating the Rainbow Layers
Now for the fun part: adding those vibrant colors!
- Divide the batter evenly into six bowls.
- Tint each portion with gel food coloring (red, orange, yellow, green, blue, and purple).
- Starting with purple, pour the batter into the crust, smoothing each layer before adding the next.
- Continue layering in reverse rainbow order until all the batter is used.
4. Baking the Cheesecake
Follow these steps to bake your masterpiece:
- Preheat the oven to 325°F (163°C).
- Place the springform pan into a water bath to ensure even baking and prevent cracking.
- Bake for 50–60 minutes or until the center is just set.
- Turn off the oven and crack the door open. Allow the cheesecake to cool for an hour before transferring it to the refrigerator to chill overnight.
Decorating the Cake
The decoration transforms your cheesecake into a stunning centerpiece. Here’s how:
Preparing the Drip Glaze
- Melt white chocolate and mix with heavy cream to create a smooth glaze.
- Divide the glaze into bowls and tint each portion with food coloring.
Applying the Glaze
- Drizzle the colored glazes over the edges of the chilled cheesecake to create a rainbow drip effect.
- Add additional Oreo pieces, sprinkles, or edible glitter to enhance the presentation.
Variations and Customizations
Baking a cheesecake isn’t without challenges. Here are solutions to common problems:
- Cracks in the cheesecake: Use a water bath and avoid overmixing the batter.
- Uneven layers: Smooth each layer before adding the next.
- Soggy crust: Wrap the springform pan tightly with aluminum foil to prevent water leakage.
This recipe is highly versatile and can be tailored to fit various preferences and occasions. Here are some ideas:
- Alternative Crusts: Swap out the Oreo crust for graham crackers, chocolate wafer cookies, or even ginger snaps for a seasonal twist.
- Flavored Cheesecake Layers: Add natural fruit purees, such as strawberry or mango, to individual layers for added flavor.
- Themed Colors: Customize the rainbow layers for holidays or events, such as red and green for Christmas or pastel shades for Easter.
- Toppings: Experiment with different toppings like caramel drizzle, fruit compote, or crushed candy bars.
- Vegan Option: Replace dairy-based ingredients with plant-based alternatives like vegan cream cheese and coconut cream to make it vegan-friendly.
Variations and Customizations
This recipe is highly versatile and can be tailored to fit various preferences and occasions. Here are some ideas:
- Alternative Crusts: Swap out the Oreo crust for graham crackers, chocolate wafer cookies, or even ginger snaps for a seasonal twist.
- Flavored Cheesecake Layers: Add natural fruit purees, such as strawberry or mango, to individual layers for added flavor.
- Themed Colors: Customize the rainbow layers for holidays or events, such as red and green for Christmas or pastel shades for Easter.
- Toppings: Experiment with different toppings like caramel drizzle, fruit compote, or crushed candy bars.
- Vegan Option: Replace dairy-based ingredients with plant-based alternatives like vegan cream cheese and coconut cream to make it vegan-friendly.
Creating a Rainbow Oreo Cheesecake Cake is an adventure in flavor, color, and creativity. Whether it’s for a special occasion or just because, this cake is sure to leave an impression. Try it out, and don’t forget to share your masterpiece with friends and family!
Serving Suggestions
-
Baking a cheesecake isn’t without challenges. Here are solutions to common problems:
- Cracks in the cheesecake: Use a water bath and avoid overmixing the batter.
- Uneven layers: Smooth each layer before adding the next.
- Soggy crust: Wrap the springform pan tightly with aluminum foil to prevent water leakage.
Serving Suggestions
Take your Rainbow Oreo Cheesecake Cake experience to the next level with these serving ideas:
- Slice with a warm knife to achieve clean, professional-looking cuts.
- Add a dollop of whipped cream or a drizzle of chocolate or caramel sauce to each slice.
- Pair with beverages like a hot espresso, rich hot chocolate, or a cold glass of milk.
- Garnish with fresh berries or additional crushed Oreo cookies for an extra pop of flavor and texture.
Creating a Rainbow Oreo Cheesecake Cake is an adventure in flavor, color, and creativity. Whether it’s for a special occasion or just because, this cake is sure to leave an impression. Try it out, and don’t forget to share your masterpiece with friends and family!
Troubleshooting Common Issues
Baking a cheesecake isn’t without challenges. Here are solutions to common problems:
- Cracks in the cheesecake: Use a water bath and avoid overmixing the batter.
- Uneven layers: Smooth each layer before adding the next.
- Soggy crust: Wrap the springform pan tightly with aluminum foil to prevent water leakage.
Creating a Rainbow Oreo Cheesecake Cake is an adventure in flavor, color, and creativity. Whether it’s for a special occasion or just because, this cake is sure to leave an impression. Try it out, and don’t forget to share your masterpiece with friends and family!
Frequently Asked Questions (FAQs)
Can I make this cake ahead of time?
Yes! The Rainbow Oreo Cheesecake Cake actually tastes better after a day in the refrigerator.
What type of food coloring should I use?
Gel-based food coloring is ideal because it provides vibrant hues without affecting the batter’s consistency.
Can I make this recipe gluten-free?
Absolutely! Swap the Oreo cookies for a gluten-free alternative.
How do I store the cheesecake?
Store it in an airtight container in the refrigerator for up to five days.
Baking a cheesecake isn’t without challenges. Here are solutions to common problems:
- Cracks in the cheesecake: Use a water bath and avoid overmixing the batter.
- Uneven layers: Smooth each layer before adding the next.
- Soggy crust: Wrap the springform pan tightly with aluminum foil to prevent water leakage.
Variations and Customizations
This recipe is highly versatile and can be tailored to fit various preferences and occasions. Here are some ideas:
- Alternative Crusts: Swap out the Oreo crust for graham crackers, chocolate wafer cookies, or even ginger snaps for a seasonal twist.
- Flavored Cheesecake Layers: Add natural fruit purees, such as strawberry or mango, to individual layers for added flavor.
- Themed Colors: Customize the rainbow layers for holidays or events, such as red and green for Christmas or pastel shades for Easter.
- Toppings: Experiment with different toppings like caramel drizzle, fruit compote, or crushed candy bars.
- Vegan Option: Replace dairy-based ingredients with plant-based alternatives like vegan cream cheese and coconut cream to make it vegan-friendly.
Serving Suggestions
Take your Rainbow Oreo Cheesecake Cake experience to the next level with these serving ideas:
- Slice with a warm knife to achieve clean, professional-looking cuts.
- Add a dollop of whipped cream or a drizzle of chocolate or caramel sauce to each slice.
- Pair with beverages like a hot espresso, rich hot chocolate, or a cold glass of milk.
- Garnish with fresh berries or additional crushed Oreo cookies for an extra pop of flavor and texture.
Conclusion
Creating a Rainbow Oreo Cheesecake Cake is an adventure in flavor, color, and creativity. With its vibrant layers, rich Oreo crust, and endless customization options, it’s perfect for any occasion. Whether it’s for a birthday, holiday, or just because, this cake is guaranteed to impress.
Don’t hesitate to get creative and make it your own. Share your masterpiece with friends and family—and most importantly, savor every delicious bite!

Rainbow Oreo Cheesecake Cake
- Total Time: 1 hour 30 minutes + overnight chilling
- Yield: 10 servings 1x
Description
A vibrant and stunning dessert with layers of creamy cheesecake, a crunchy Oreo crust, and colorful rainbow appeal.
Ingredients
- 2 cups crushed Oreo cookies (about 20 Oreos)
- 5 tbsp melted butter
- 24 oz cream cheese (softened)
- 1 cup granulated sugar
- 3 large eggs
- 1 cup heavy cream
- 1 tsp vanilla extract
- Food coloring: red, orange, yellow, green, blue, purple
- 1 cup white chocolate (for glaze)
- ½ cup heavy cream
- Additional Oreos, sprinkles, or edible glitter (for decoration)
Instructions
- Preheat the oven to 325°F (163°C).
- Crush Oreos into fine crumbs and mix with melted butter. Press into the bottom of a lined 9-inch springform pan, then chill in the refrigerator.
- In a bowl, beat softened cream cheese and sugar until smooth. Add eggs one at a time, mixing well after each addition. Stir in heavy cream and vanilla extract.
- Divide the batter evenly into six bowls and tint each with gel-based food coloring (red, orange, yellow, green, blue, purple).
- Pour the purple batter into the crust and smooth. Layer each colored batter in reverse rainbow order, smoothing each layer before adding the next.
- Place the springform pan into a water bath and bake for 50–60 minutes, or until the center is just set. Turn off the oven, crack the door, and allow the cake to cool for an hour before chilling in the refrigerator overnight.
- For the glaze, melt white chocolate and mix with heavy cream until smooth. Tint portions with food coloring, and drizzle over the edges of the chilled cheesecake for a rainbow drip effect.
- Decorate with additional Oreo pieces, sprinkles, or edible glitter before serving.
Notes
For vibrant colors, use gel-based food coloring. Be sure to smooth each layer for an even rainbow effect.
- Prep Time: 30 minutes
- Cook Time: 1 hour
- Category: Dessert
- Method: Baking
- Cuisine: American
Nutrition
- Serving Size: 1 slice
- Calories: 480
- Sugar: 33g
- Sodium: 350mg
- Fat: 28g
- Saturated Fat: 16g
- Unsaturated Fat: 10g
- Trans Fat: 0g
- Carbohydrates: 45g
- Fiber: 1g
- Protein: 7g
- Cholesterol: 110mg
Keywords: cheesecake, rainbow dessert, Oreo crust, colorful cake