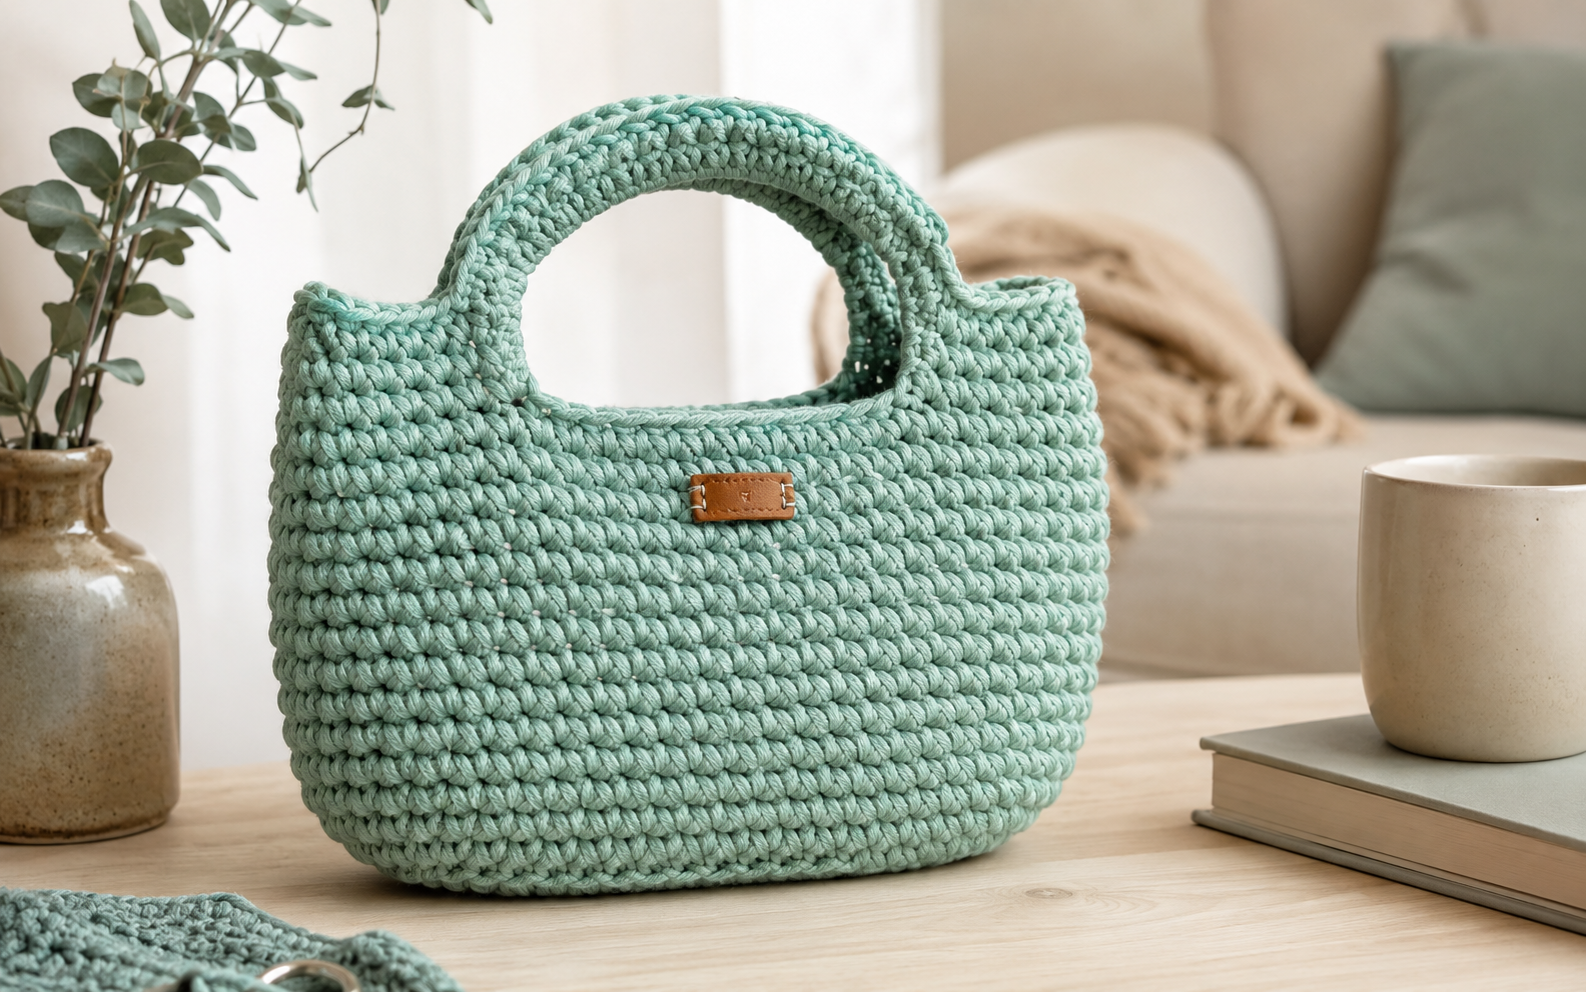
If you’ve been looking for an easy bag for beginners, this simple daily bag is a beautiful project to add to your handmade wardrobe. With its soft rounded shape, chunky crochet texture, comfortable handle, and practical everyday size, it is the kind of project you can actually use rather than simply display.
The bag shown here is worked in a soft mint-green yarn with a compact stitch texture and a gently rounded base. Its simple construction makes it especially approachable for newer crocheters, while the finished design has a polished, modern look.
You can use this crochet daily bag for your phone, wallet, keys, sunglasses, cosmetics, or other lightweight essentials. It can also be customized with different colors, a fabric lining, decorative flowers, buttons, labels, or even a longer strap for shoulder or crossbody wear.
The pattern below explains the construction, measurements, materials, techniques, fitting tips, and customization options so you can create a bag that works for your own needs.
Why You’ll Love This Crochet Bag
There are plenty of crochet bag patterns available, but a good beginner project should teach useful techniques without becoming overwhelming.
This design does exactly that.
The bag begins with a simple oval base. Once the base reaches the desired size, you stop increasing and continue working upward to create the sides. The handle is then built into the upper portion of the bag and reinforced for everyday use.
That means you don’t need to crochet several complicated panels and sew them together.
You’ll also learn techniques that can be used in many other crochet projects.
This bag is:
- Beginner-friendly
- Practical for everyday use
- Quick compared with larger crochet projects
- Suitable for thick cotton yarn
- Easy to resize
- Easy to customize
- Great for handmade gifts
- Suitable for different seasons
- Ideal for practicing consistent tension
- Easy to adapt into a shoulder bag or small tote
Finished Crochet Bag Size
The sample bag is approximately 25 cm wide and 18 cm tall, not including the handle.
Because crochet tension varies from one person to another, your finished bag may be slightly different even when following the same instructions.
| Feature | Approximate Measurement |
|---|---|
| Bag width | 25 cm / 9.8 in |
| Bag height | 18 cm / 7.1 in |
| Recommended hook | 6 mm |
| Yarn | Thick cotton |
| Construction | Oval base + sides + handle |
| Skill level | Beginner |
| Shape | Soft rounded handbag |
| Closure | Optional |
| Lining | Optional |
These measurements are a useful starting point rather than strict requirements.
For the best result, measure your work as you crochet and adjust the number of rounds if necessary.
Materials You’ll Need
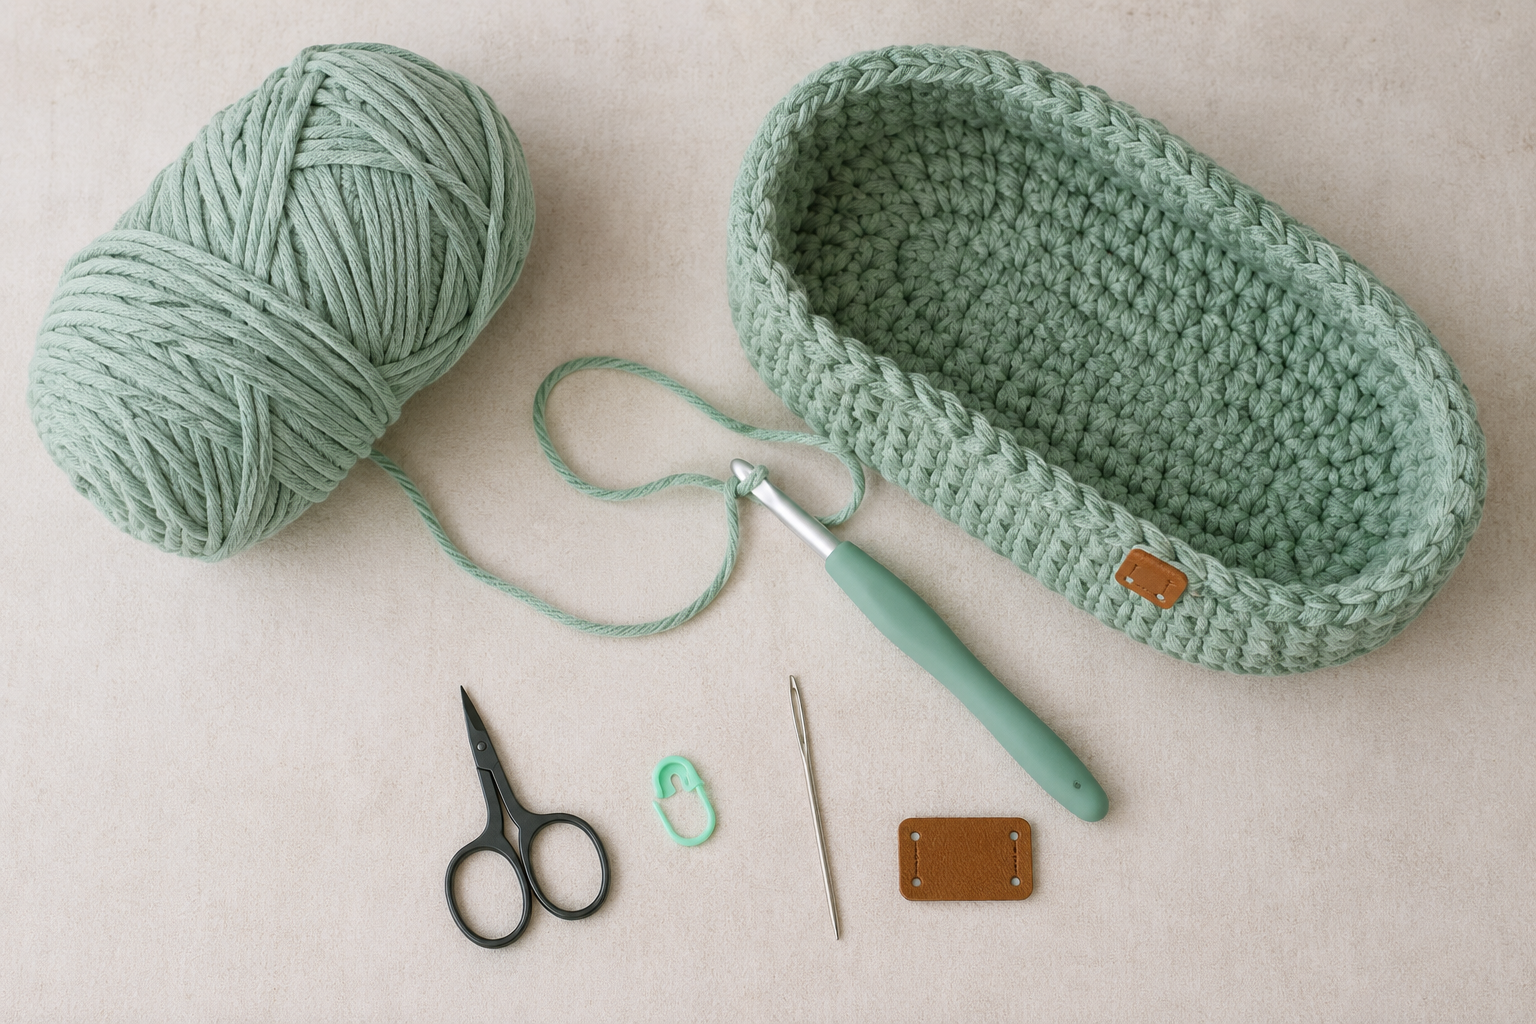
You only need a handful of supplies to make this crochet handbag.
| Material | Recommendation |
|---|---|
| Thick cotton yarn | Main color |
| Crochet hook | 6 mm |
| Stitch marker | 1 or more |
| Tapestry needle | 1 |
| Scissors | 1 pair |
| Label | Optional |
| Fabric | Optional lining |
| Button or magnetic snap | Optional closure |
A sturdy cotton yarn is particularly suitable because it gives the bag enough structure for everyday use.
If you don’t have thick cotton yarn, you can experiment with another medium-to-bulky yarn, but remember that changing the yarn weight will also change the finished dimensions.
Choosing the Best Yarn for a Crochet Bag
The yarn you choose can make a big difference in the final appearance and durability of your bag.
For a daily handbag, look for yarn that has:
- Good stitch definition
- Moderate structure
- Reasonable durability
- Low to moderate stretch
- Easy-care washing instructions
Cotton is one of the most popular choices for crochet bags because it produces a firm fabric and doesn’t usually have the same amount of stretch as some synthetic fibers.
A thick cotton yarn also makes the project work up faster than using a fine yarn.
Color Ideas for Your Crochet Bag
The mint-green color shown in the example gives the bag a soft spring and summer feel, but you can completely change its personality with your color choice.
| Color Combination | Style |
|---|---|
| Mint + Cream | Fresh and soft |
| Sage + Beige | Natural and modern |
| Blush + White | Feminine |
| Lavender + Cream | Soft and romantic |
| Terracotta + Oatmeal | Warm and earthy |
| Black + Cream | Classic |
| Navy + White | Clean and timeless |
| Mustard + Brown | Autumn-inspired |
| Aqua + Coral | Bright and summery |
| Olive + Tan | Rustic |
For an everyday neutral bag, beige, oatmeal, cream, taupe, or sage are excellent choices.
For a statement handbag, try coral, lavender, mustard, pink, or turquoise.
Crochet Abbreviations
The pattern uses standard US crochet terminology.
| Abbreviation | Meaning |
|---|---|
| ch | Chain |
| sc | Single crochet |
| sl st | Slip stitch |
| st | Stitch |
| sts | Stitches |
| rnd | Round |
| rep | Repeat |
| inc | Increase |
Crochet Skills You’ll Practice
This project is more than just a finished handbag. It is also a useful beginner exercise.
While making the bag, you’ll practice:
- Foundation chains
- Single crochet
- Working around a foundation chain
- Increasing
- Working in rounds
- Joining rounds
- Shaping an oval base
- Building straight sides
- Creating a crochet handle
- Reinforcing stress points
- Weaving in yarn ends
- Basic finishing
Once you understand the oval base, you can use the same construction for many other crochet projects.
Understanding the Construction
The bag can be broken down into three simple sections:
The base: An oval shape created by crocheting around the foundation chain.
The body: Single crochet rounds worked without increasing so the sides rise upward.
The handle: A reinforced crochet section attached to both sides of the upper opening.
This construction is particularly beginner-friendly because the bag doesn’t require complicated shaping.
The most important part is getting the base right.
If the base is too narrow, the finished bag will be smaller than expected. If you add too many increases, the base may become wavy.
How to Measure Your Crochet Bag
Before you start making the sides, measure the base.
For the sample design, aim for approximately 25 cm across its longest dimension.
Don’t worry if your stitch count is slightly different.
Crochet tension can vary dramatically between crocheters, even when using the same hook and yarn.
Your measurements are more important than copying a specific number of stitches.
Crochet Daily Bag Pattern
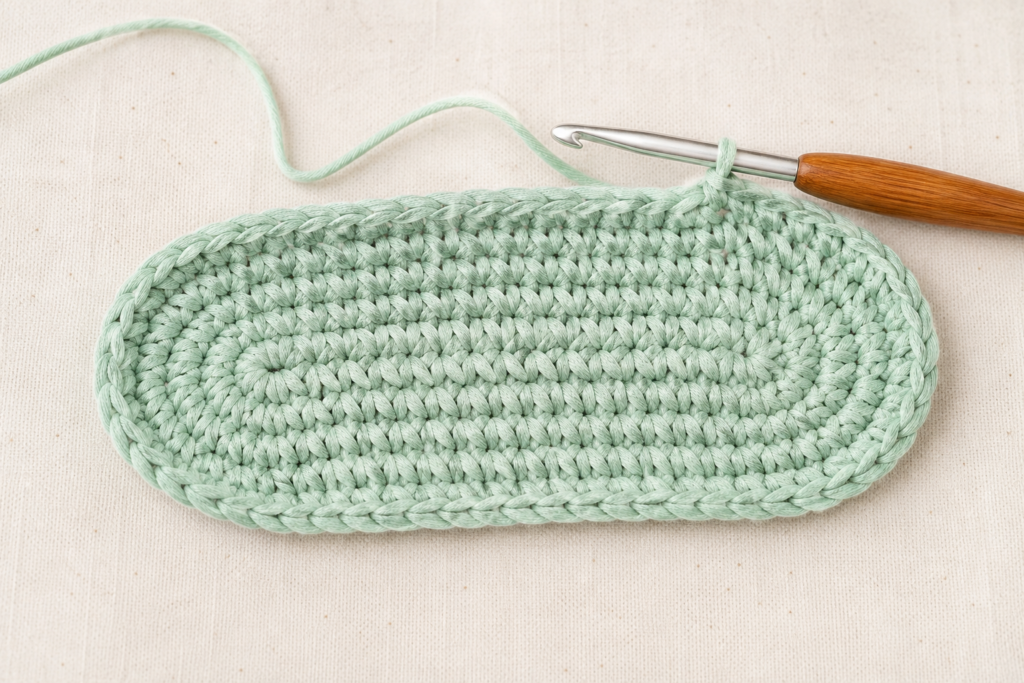
The bag begins with a foundation chain and is worked around both sides to create an oval base.
From there, you continue upward in rounds.
The following construction is designed to be easy to customize.
Step 1: Make the Foundation Chain
With your main color yarn and a 6 mm crochet hook, make a foundation chain of approximately 18 chains.
Try not to make your chains excessively tight.
A tight foundation chain can cause the base to curl or become narrower than intended.
If you naturally crochet tightly, consciously relax your grip on the yarn while making the foundation chain.
Step 2: Work Single Crochet Along the Chain
Begin working single crochet stitches into the foundation chain.
Work along one side of the chain until you reach the end.
Instead of turning your work, continue around the end of the chain and work into the opposite side.
This creates the beginning of the oval base.
Think of the foundation chain as the center line of the base.
You are essentially crocheting around it rather than simply working back and forth.
Step 3: Shape the Rounded Ends
The ends of the foundation chain need increases to create the rounded shape.
Add increases around the two ends while continuing to work single crochet along the longer sides.
The exact number of increases can vary depending on your yarn and tension.
The important goal is to keep the base flat.
If the base begins curling upward, you probably need more increases.
If the base starts looking ruffled or wavy, you may be adding too many.
Step 4: Continue Building the Oval Base
Continue working rounds around the base until it reaches approximately 25 cm at its longest point.
Place a stitch marker at the beginning of your round if you’re working in continuous rounds.
Check the shape after every few rounds.
The base should remain relatively flat.
This is the best point to make adjustments because once the sides are built, changing the size becomes much more difficult.
Step 5: Stop Increasing
Once the base reaches the size you want, stop adding increases.
Continue working single crochet stitches evenly around the entire base.
The fabric should begin turning upward.
This is how the sides of your crochet bag are created.
From this point onward, the stitch count should remain relatively consistent unless you intentionally change the shape.
Step 6: Build the Bag Sides
Continue working single crochet rounds around the bag.
Keep your tension consistent so that the sides remain even.
For the sample, work until the bag body measures approximately 18 cm tall.
You can make the bag deeper by adding more rounds.
For a smaller handbag, stop earlier.
Don’t be afraid to place the work next to a ruler while crocheting.
Your finished bag doesn’t need to match the sample exactly to be successful.
How to Keep Your Crochet Sides Straight
If your bag begins getting wider as you work upward, you may accidentally be adding stitches.
If it becomes narrower, you may be missing stitches.
This is why a stitch marker can be extremely helpful.
At the end of every round:
- Check your stitch count.
- Move the stitch marker.
- Look at the shape of the bag.
- Check the height.
- Correct mistakes early.
Fixing a mistake after two or three rounds is much easier than discovering it after twenty rounds.
Step 7: Finish the Top Edge
Once the body reaches the desired height, work one final round of single crochet around the opening.
This gives the top edge a clean and stable finish.
You can also use slip stitches if you want a slightly firmer decorative edge.
Avoid making the final edge excessively tight.
The opening should remain comfortable to access.
Step 8: Create the Handle
The handle can be created directly from the top of the bag.
Decide how long you want the handle before attaching it.
For a small handbag, a short handle is ideal.
For a shoulder bag, make the handle longer.
Create a chain long enough to form the desired handle opening, then work single crochet stitches back across the chain to create a thicker strap.
Attach both ends securely to the bag.
Step 9: Reinforce the Handle
The handle is the part of the bag most likely to experience stress.
Don’t rely on a single row of stitches at the attachment points.
Reinforce both sides by working additional stitches around the connection area.
You can also sew through the attachment point several times with a tapestry needle and matching yarn.
This is especially important if you plan to carry the bag regularly.
How to Choose the Right Handle Length
Your ideal handle length depends on how you plan to carry the bag.
| Handle Style | Best For |
|---|---|
| Short | Hand carrying |
| Medium | Wrist or hand |
| Long | Shoulder |
| Extra long | Crossbody |
Before finishing the handle, hold the bag against your body.
This simple test can prevent you from ending up with a strap that is uncomfortable or awkward.
How to Make a Stronger Crochet Handle
If you’re planning to use the bag every day, consider making the handle wider.
You can also reinforce the inside of the handle with additional yarn.
Another option is to sew a narrow strip of fabric or webbing inside the crochet handle.
This can help reduce stretching over time.
Optional: Add a Fabric Lining
A lining isn’t necessary, but it can make your crochet bag more practical.
A fabric lining can:
- Prevent small objects from falling through stitches
- Give the bag additional structure
- Protect the inside of the crochet
- Make the bag feel more finished
- Allow you to add an interior pocket
A simple cotton lining is a good beginner-friendly choice.
Choose a fabric that complements your yarn.
How to Add a Simple Lining
First, measure the inside of your finished bag.
Cut two pieces of fabric slightly larger than the bag’s interior to allow for seam allowances.
Sew the pieces together along the sides and bottom.
Fold the top edge inward.
Place the lining inside the crochet bag.
Hand-sew the lining around the upper edge using small, neat stitches.
If you want an interior pocket, add it to the lining before sewing the lining into the bag.
Optional Closures
The sample design has an open top, which gives it a relaxed everyday look.
However, you can add a closure if you’d like more security.
Good options include:
- Magnetic snap
- Button and loop
- Zipper
- Drawstring
- Toggle
- Crochet flap
A magnetic snap is particularly convenient for a beginner because it doesn’t require changing the crochet construction.
Adding a Decorative Label
A small label can give your crochet bag a boutique-style appearance.
You can use:
- Wooden labels
- Faux-leather labels
- Fabric labels
- Embroidered tags
- Personalized labels
Position the label on the front of the bag and sew it securely.
Avoid placing it too close to the bottom, where it may be exposed to more wear.
Easy Ways to Customize Your Crochet Bag
The basic design is intentionally simple, which means you can use it as a blank canvas.
Try adding:
- Crochet flowers
- Small bows
- Decorative buttons
- Tassels
- Fringe
- Embroidered initials
- Color blocks
- Stripes
- Granny-square panels
- Appliqué shapes
A simple bag can look completely different depending on the finishing details.
How to Make a Striped Crochet Bag
Stripes are one of the easiest ways to customize this project.
Work several rounds in your main color, then change to a contrasting shade.
You can create:
- Two-color stripes
- Rainbow stripes
- Thin alternating stripes
- Wide color blocks
- Seasonal color combinations
For cleaner color changes, change yarn at the end of the previous stitch before completing the final yarn-over.
How to Make a Smaller Crochet Bag
To make a smaller version, reduce the length of your foundation chain.
Then create a smaller oval base before starting the side rounds.
You can also reduce the height of the body.
A smaller version would work well as:
- Phone bag
- Mini purse
- Child’s handbag
- Small gift bag
- Crochet pouch
How to Make a Larger Crochet Bag
For a larger version, increase the dimensions of the oval base.
Then continue working additional rounds for a deeper body.
Remember that increasing the size also increases the weight of the finished bag.
For a larger daily bag, reinforce the handle and consider adding a fabric lining.
How to Turn It Into a Crossbody Bag
The same basic body can be transformed into a crossbody bag by replacing the short handle with a longer strap.
Make the strap long enough to sit comfortably across your body.
For additional durability, consider attaching the strap using reinforced crochet tabs or metal D-rings.
If using hardware, make sure the attachment points are strong enough for the intended load.
How to Make a More Structured Crochet Bag
If you want your handbag to stand upright rather than collapse softly, try these adjustments:
- Use thicker cotton yarn.
- Use a slightly smaller hook.
- Keep your stitches firm and consistent.
- Add a fabric lining.
- Add a lightweight base insert.
- Reinforce the bottom.
- Avoid excessively stretchy yarn.
A lining combined with a sturdy cotton yarn can make a surprisingly big difference.
Beginner Tips for Better Results
The biggest secret to making a professional-looking crochet bag isn’t complicated stitches.
It is consistent tension and careful finishing.
Try to keep your stitches approximately the same size throughout the project.
Count your stitches regularly.
Check your measurements.
Don’t rush the handle.
And spend time weaving in your ends neatly.
These small details can make a simple crochet design look much more polished.
Common Problems and How to Fix Them
| Problem | Possible Cause | What to Do |
|---|---|---|
| Base curls upward | Too few increases | Add increases at rounded ends |
| Base becomes wavy | Too many increases | Reduce increases |
| Bag gets wider | Accidental increases | Check stitch count |
| Bag gets narrower | Missed stitches | Count stitches regularly |
| Handle stretches | Insufficient reinforcement | Strengthen attachment points |
| Top edge looks uneven | Inconsistent tension | Work more slowly and evenly |
| Bag is too small | Tight tension | Add rounds or use larger hook |
| Bag is too large | Loose tension | Reduce rounds or use smaller hook |
| Small items fall through | Large stitch gaps | Add a lining |
| Bag loses shape | Soft/stretchy yarn | Use firmer yarn and lining |
Why Is My Crochet Bag Base Curling?
A curling base is one of the most common problems when making crochet bags.
If the base curls upward like a bowl, there may not be enough increases around the rounded ends.
Try adding a few more increases in the next round.
If the edge becomes wavy instead, you’ve probably added too many.
The ideal base should remain reasonably flat before you begin building the sides.
Why Is My Crochet Bag Wavy?
A wavy or ruffled base usually means there are too many stitches around the edges.
Undo the last round and reduce the number of increases.
Remember that the goal isn’t to achieve a specific number of stitches at all costs.
The goal is to create a flat, stable oval that matches the desired measurements.
Why Is My Crochet Bag Stretching?
Some stretching is normal, especially when the bag contains heavier objects.
If excessive stretching is a problem, try:
- Using cotton yarn
- Using a smaller hook
- Making tighter stitches
- Adding a lining
- Reinforcing the handle
- Avoiding excessive weight
A fabric lining is particularly helpful for an everyday handbag.
What Can You Carry in This Crochet Bag?
The sample size is suitable for lightweight everyday essentials.
You can comfortably use it for items such as:
- Smartphone
- Wallet
- Keys
- Sunglasses
- Small cosmetics
- Lip balm
- Earbuds
- Small notebook
- Hand sanitizer
- Small crochet accessories
Avoid filling a small crochet bag with heavy objects unless you’ve reinforced the base and handle.
How to Make This Bag Suitable for Different Seasons
The shape works throughout the year.
For spring, try:
Mint + cream + soft pink
For summer:
Aqua + coral + white
For fall:
Terracotta + mustard + oatmeal
For winter:
Burgundy + cream + forest green
For a timeless everyday bag:
Sage + beige + natural brown
Changing the colors is one of the easiest ways to create a completely new look without changing the pattern.
Crochet Bag Gift Ideas
A handmade crochet handbag can make a thoughtful gift because it combines creativity with practical use.
You can personalize it by choosing the recipient’s favorite colors.
For a complete gift, pair the bag with a matching:
- Crochet coin purse
- Crochet keychain
- Crochet phone pouch
- Crochet sunglasses case
- Crochet wallet
- Handmade scrunchie
A coordinated set feels especially special when everything uses the same yarn palette.
How to Photograph Your Finished Crochet Bag
If you’re making this project for your own crochet blog or Pinterest account, photography matters almost as much as the finished project.
Take at least three types of photographs.
First, photograph the entire bag against a clean background.
Second, take a close-up photograph showing the crochet texture.
Third, photograph the bag being used in a realistic lifestyle setting.
For Pinterest, a vertical image showing the entire bag with a short, curiosity-driven headline can work particularly well.
Frequently Asked Questions
Is this crochet bag good for beginners?
Yes. The basic construction relies on simple crochet stitches and an easy-to-understand shape. Beginners should pay particular attention to the oval base, stitch counting, and handle reinforcement.
What yarn is best for a crochet handbag?
Thick cotton yarn is a strong choice because it produces a durable fabric with good stitch definition. Choose yarn according to the manufacturer’s recommended care instructions and the amount of structure you want.
What hook size should I use?
The sample uses a 6 mm crochet hook with thick cotton yarn. If your yarn is significantly thinner or thicker, choose a hook appropriate for that yarn and use the finished measurements as your guide.
Can I make this crochet bag without a lining?
Yes. A lining is completely optional. However, adding one can make the bag more durable and prevent small items from slipping through the stitches.
Can I make the handle longer?
Absolutely. Increase the foundation chain used for the handle until it reaches your preferred length. Always test the handle on your body before finishing the attachment points.
Can I make this bag with acrylic yarn?
Yes, but the final result may have more stretch depending on the yarn. Cotton is generally preferable when you want a firm everyday handbag.
How much yarn do I need?
The exact amount depends on the yarn thickness, stitch tension, finished size, and handle length. A larger bag will naturally require more yarn than the approximately 25 cm × 18 cm sample.
For that reason, it’s best to have more yarn available than you think you’ll need, especially if you’re using a specific color that may be difficult to find later.
Can I add a zipper?
Yes. A zipper can be sewn into the top opening after the crochet body is complete. If you’re new to sewing zippers, a magnetic snap or button closure is an easier alternative.
How do I make my crochet bag more durable?
Use sturdy yarn, maintain consistent tension, reinforce the handle, and consider adding a lining. Avoid carrying excessive weight, particularly if the bag has a thin strap.
Can I sell finished crochet bags made from this pattern?
If you’re working from a pattern that allows finished items to be sold, follow its specific terms. You should never copy or redistribute another designer’s written instructions, photographs, or graphics.
If you’re selling your own original finished products, keep your construction, photography, and written content original.
More Crochet Projects for Your Kitchen & Home
A crochet bag doesn’t have to be separate from your kitchen crochet collection.
If your goal is to create a website focused on useful crochet projects for the home, you can connect fashion accessories with practical handmade projects.
For example, after making this bag, you could try a crochet basket for kitchen organization, a crochet mug cozy for your coffee station, or a set of crochet coasters for the dining table.
Other useful projects include:
- Crochet mug cozies
- Crochet coasters
- Crochet mug rugs
- Crochet baskets
- Crochet kitchen towels
- Crochet dishcloths
- Crochet placemats
- Crochet potholders
- Crochet table runners
- Crochet storage baskets
This creates natural connections between your crochet articles and gives readers more projects to explore.
Related Crochet Posts
If you enjoyed this crochet daily bag, these projects would make excellent next reads:
- Crochet Pumpkin Mug Cozy Pattern | Cozy Fall Coffee Cup Sleeve
- 25 Easy Crochet Coaster Ideas for Beginners
- 21 Cute Crochet Mug Rug Ideas for a Cozy Kitchen
- 23 Easy Crochet Basket Patterns for Kitchen Storage
- 27 Crochet Kitchen Towel Ideas for a Handmade Home
- 30 Cozy Crochet Blanket Ideas for Fall
- 21 Easy Crochet Projects for Beginners
- 25 Cute Crochet Home Decor Ideas
- 20 Easy Crochet Bag Ideas You’ll Want to Make
- 25 Crochet Gift Ideas for Handmade Lovers
Final Thoughts
This crochet daily bag for beginners is a great example of how a simple construction can create a practical and stylish handmade accessory.
The oval base provides the foundation, the single crochet rounds create the body, and the reinforced crochet handle turns the project into a useful everyday handbag.
Once you’ve made the basic version, you can easily make the design your own. Experiment with colors, add a lining, change the handle length, attach a decorative label, or create a completely different seasonal color palette.
If you’re new to crochet bags, focus first on getting the base flat, the sides even, and the handle securely attached. Those three details will have the biggest impact on the quality of the finished bag.
And once you’ve mastered this simple construction, you’ll have the skills to experiment with larger totes, shoulder bags, crossbody bags, baskets, and other crochet projects built from an oval base.
Choose your favorite yarn, grab your 6 mm hook, and make a crochet bag that’s designed around your own everyday style.